How to Sew a Backpack Purse with Flap Closure

This backpack purse is the perfect sewing project for all skill levels.
I sewed this backpack purse with flap closure to use on my vacation. I used a cotton canvas for the outside, a fun quilting cotton for the inside, and cotton webbing for the straps. Sew some fun accessories to put in your backpack like a small zipper pouch coin purse or a gift card / credit card holder.
Let’s checkout the backpack purse sewing tutorial:
This post contains affiliate links. Please see below disclosure for more information.
Backpack purse supplies needed:
- Two pieces of outer canvas fabric (or outer fabric of choice) 14″Wx15″H – my favorite fabric shop
- Two pieces of lining fabric 14″Wx15″H
- Two pieces of outer fabric 12″Wx8″H
- Cutting mat
- Rotary cutter
- Clear ruler
- Fusible interfacing or batting
- Magnetic snap
- Marking pencil
- Seam ripper
- 1.5″ Heavy cotton webbing – 2 strips 26-inches for the straps
- 1” Heavy cotton webbing – 8-inches for the short strap
- Matching thread
- Sewing scissors
- Sewing machine
***You can find the ad-free, printable PDF version of this sewing tutorial available for purchase in my Etsy shop HERE. Includes 15 pages of step-by-step instructions with pictures. Print a copy to keep next to your sewing machine for easy reference.***
Measure and cut the fabric

Using your cutting mat, clear ruler, and rotary cutter, cut two pieces of outer fabric and two pieces of lining fabric measuring 14″W x 15″H. Cut two pieces of outer fabric measuring 12″W x 8″H for the backpack purse flap closure.
Cut batting or fusible interfacing measuring 14″W x 15″H for the two outer fabric pieces and the two lining fabric pieces. I chose to use cotton batting.
OPTIONAL CUTS: Cut one coordinating fabric piece 6″W x 8″H for accent on the front of the flap. Cut two pieces of the lining fabric measuring 14″W x 6″H for inside slip pockets. Cut two pieces of lining fabric measuring 9″W x 7″H for inside zipper pocket with a 7-inch zipper.
Attach accent fabric

If you are using a fabric accent, now is the time to attach. With wrong side facing up, fold each long side in until the edges meet and press the folds. The folded accent piece should measure 3″W x 8″H once folded. Using matching thread, center the accent piece, with the edges face down, on the front flap closure fabric and sew along each long edge as close to the edge as possible.

I added a second accent piece measuring 3″W x 8″H – folded measuring 1.5″W x 8″H.
Sew the flap closure

Round the bottom corners of your flap closure (optional). I used a lid but you can use anything with a round base. Place the lid about 2 inches from each corner and trace with your marking pencil.

Cut along the lines with your sewing scissors.

Place the flap pieces in the following order: batting / bottom flap fabric piece right side up / top flap fabric piece right side down.


Using a 3/8″ seam allowance, sew the sides and bottom, leaving the top open.

Clip little triangles around the curves with your sewing scissors.

Turn right side out and press. Top stitch around the sewn edges to give it a finished look.
***You can find the ad-free, printable PDF version of this sewing tutorial available for purchase in my Etsy shop HERE. Includes 15 pages of step-by-step instructions with pictures. Print a copy to keep next to your sewing machine for easy reference.***
Add the magnetic snap to flap
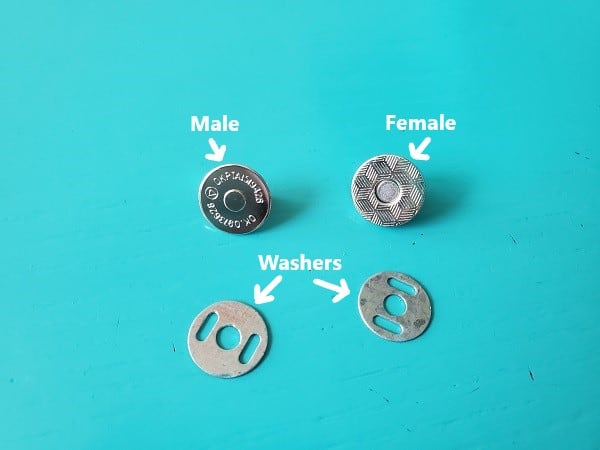
The magnetic snap has four parts – male, female, and two washers.
You will be attaching the male magnetic snap to the inside of the backpack purse flap closure.

Figure out where on the flap you would like the magnetic snap to be and place one of the washers there.

Mark the slots on the washer with a marking pencil. Cut the slits with your seam ripper (cut just a bit smaller than your pencil mark. You don’t want the slits too big).

Place the of the male magnetic snap through the slits you just made.

Place the washer on the back of the snap as shown in the above picture.

Hold down on the washer and fold one of the prongs toward the center of the snap. (I use scissors or something sturdy to push down on the prong). Repeat with the other prong.
The female magnetic snap will be added after the backpack purse is sewn together.
Square the bottom of the backpack
Place one of the outer fabric pieces on top of the batting piece, right side up.

Using your clear ruler and marking pencil, mark a 2.5 inch square at each bottom corner.
Cut out using your sewing scissors.
Repeat with the other outer fabric and both lining pieces.
Attach the backpack straps

With the back fabric piece of the backpack facing right side up, place each outside edge of the short webbing strap 5-inches from the edge of the fabric. See above picture.

Baste the strap to the fabric to hold in place.

Next with the back fabric piece facing right side up, place one end of the 26-inch strap 3-inches from the edge of the fabric and baste to hold in place.

Place the other end of the strap 3/4-inch above the bottom square. (Be sure your strap is not twisted). See above picture. Baste to hold in place.
Repeat with the other 26-inch strap.
Attach the backpack flap closure

Place the flap closure, right side down, on top of the back fabric piece. Each edge of the flap should be about 1.25 inch from the edge of the fabric piece.
Baste to hold in place.
Sew the outer fabric pieces together
Use a 3/8-inch seam allowance.
You will not be sewing around the squares. You’ll sew those in a later step.
Place the pieces in the following order: batting / outer fabric piece right side up / outer fabric piece right side down / batting.

With right sides together, line up the sides and and bottom, clip or pin to hold in place.

Sew the sides and bottom. Sew over the straps a couple times for extra durability.
Add the pockets
If you want to add any inside pockets, now is the time to add them. To add a zipper pocket, follow these instructions on how to add a zipper pocket to a bag. To add slip pockets, follow these instructions on how to add slip pockets to a bag.
Sew the lining fabric pieces together
Follow the same steps as outer fabrics above to sew the lining pieces together.
Square the bottom

Pinch together and line up the seams.

Pin or clip in place.

Sew along the edge using a 3/8-inch seam allowance.
Repeat with the other three corners.
Attach the other magnetic snap

With the outer piece right side out, close the flap and make a small mark where the snap touches the bag.

Place the washer over the mark and mark the slots.
Follow the same steps as above to attach the female magnetic snap.
Sew the backpack purse together

Turn the outer backpack piece wrong side out. With the lining fabric right side out, place the lining piece inside the outer piece. The right sides of the fabric should be facing each other and the straps and flap should be in between the two bags.


Use a 3/8-inch seam allowance. Sew around the top of the backpack, leaving an opening in the front for turning. Sew over the straps a couple times for extra durability.
Turn the backpack right side out


Turn the backpack purse right side out. Push out the corners. Push the lining piece into the outer piece.
Press around the top of the backpack.

With the flap open, topstitch around the top of the bag. This will give your backpack a finished look and sew the opening closed.
Press.
***You can find the ad-free, printable PDF version of this sewing tutorial available for purchase in my Etsy shop HERE. Includes 15 pages of step-by-step instructions with pictures. Print a copy to keep next to your sewing machine for easy reference.***
Pin for later!


You are finished!
I hope you enjoyed this sewing tutorial on how to make a backpack purse with flap closure. Happy sewing!


Other handbag tutorials:
- Simple Tote Bag Sewing Pattern
- How to Sew a Wristlet Purse
- Curved Top Shoulder Bag Sewing Pattern
- Messenger Sling Bag Sewing Tutorial